OT Monitor
The OTmonitor is a small utility that is intended to help you configure and monitor your OTGW. The program can display the information from your central heating system in several ways. On the top of the screen it shows the latest values of the most interesting parameters. Below that is an area that provides the user a choice of three tabs for a longer term overview of the message exchange.
It is possible to run OTmonitor in docker. In that case, OTmonitor will run headless and all interaction happens via the browser.
Graph
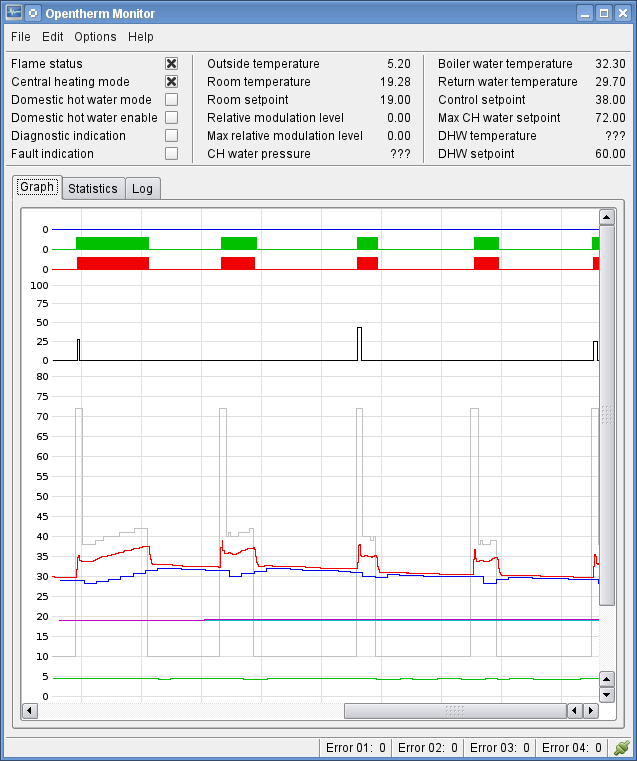
The Graph tab displays graphs for a number of parameters that are being reported over the opentherm interface. The first three lines are on/off indications for: Domestic hot water mode (blue), Central heating mode (green), and Flame status (red). The next line shows the Relative modulation level (black). The last part shows a number of temperature parameters: Control Setpoint (grey), Boiler temperature (red), Return water temperature (blue), Room setpoint (cyan), Room temperature (magenta), and Outside temperature (green).
Statistics
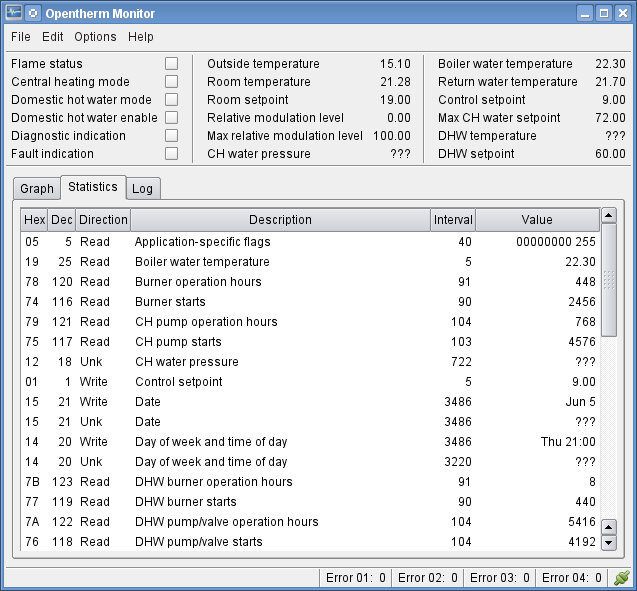
The Statistics tab provides an overview of the messages being exchanged over the opentherm connection, the average time between messages with the same message ID, and the data value(s) on the last occurrence. You can sort the data based on different properties by clicking on the table header for the desired column.
Message Log
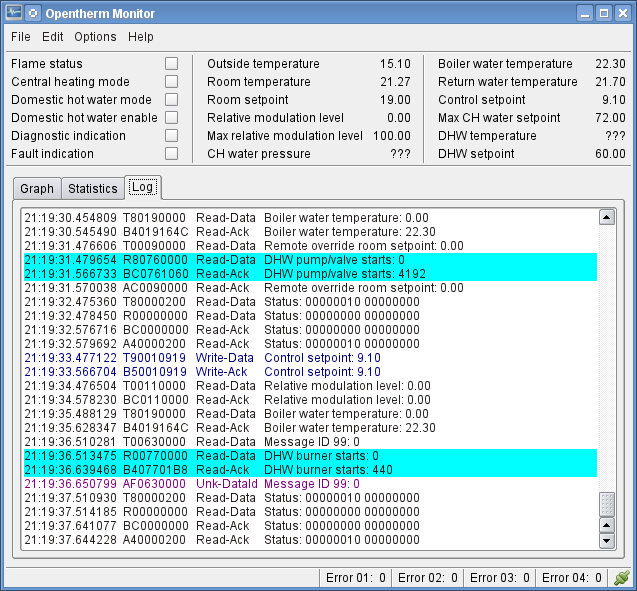
The Log tab shows the individual opentherm messages, along with a time stamp and the decoded meaning of the messages. If one or more message types have been selected on the Statistics tab, all messages with those message IDs will be highlighted in the message log. This makes it very easy to find messages of special interest.
Configuration
The Options menu provides direct access to the different sections of the Configuration screen. Once in the Configuration screen, you can navigate to other sections by clicking the name in the pane on the left.
 The thermostat section allows you to control the setpoint.
The Temporary button will instruct the thermostat to change the setpoint to
the specified value until the next pre-programmed setpoint change. With the
Constant button the setpoint change will remain in effect until some manual
action is taken to undo the change. The Schedule button cancels the setpoint
override and allows the thermostat to take control over the setpoint again.
The thermostat section allows you to control the setpoint.
The Temporary button will instruct the thermostat to change the setpoint to
the specified value until the next pre-programmed setpoint change. With the
Constant button the setpoint change will remain in effect until some manual
action is taken to undo the change. The Schedule button cancels the setpoint
override and allows the thermostat to take control over the setpoint again.
Of course, this functionality heavily depends on the level of support the thermostat provides for overriding the setpoint.
The thermostat section also provides a way to send the current date and time
to the gateway. These values will be returned to the thermostat when it
sends date or time messages. Because the gateway is unable to accurately
keep track of the time, it won't update the time on its own. It just
discards the time value after just over one minute. To maintain a correct
time in the gateway, it has to be informed of a new value every minute. The
"Automatically update the gateway clock" option will make otmonitor take
care of that. It will also update the date value every day at midnight.
Other sections of the configuration screen similarly provide controls to configure the behavior of the gateway. The heater sections lets you set the domestic hot water setpoint, the maximum central heating setpoint and the comfort mode. The GPIO ports and LEDS can be configured via the I/O pins section. The settings section has controls for the gateway itself, like the reference voltage and the setback temperature. The counters sections shows the pump and burner counters and allows you to reset them. The gateway mode can be configured on the miscellaneous section. There's also an entry box for sending free format commands to the gateway.
The remaining sections contain settings for the application. How it connects to the gateway, which information it logs and where, which alerts it will send and how, and the web server configuration.
Firmware upgrade
The firmware upgrade option in the File menu allows the user to load new firmware in the Opentherm Gateway without the need for a PIC programmer. This also means that the device doesn't have to be opened up, which can be a great advantage when it has been installed in a hard to reach place. The communication between the thermostat and the boiler continues while the firmware is being upgraded.
 A popup screen allows the user to specify the firmware file to load. After
the file has been selected, an indication of the amount of required memory
is provided. At this point the firmware can be loaded into the device by
clicking the "Program" button.
A popup screen allows the user to specify the firmware file to load. After
the file has been selected, an indication of the amount of required memory
is provided. At this point the firmware can be loaded into the device by
clicking the "Program" button.
Depending on the connection method used, the program will automatically instruct the device to enter self-programming mode, or ask the user to reset the device to allow switching to self-programming mode. Once the device has entered self-programming mode the firmware is loaded, after which the device resets and then resumes normal operation.
Web server
The Opentherm Monitor application has a built-in web server that allows you to monitor and control your central heating system from a different computer than the one that runs the application. Just point your browser to the IP-address or FQDN and port of the system running otmonitor. The web interface provides many of the same information sources and controls as the application. The web pages do use some html5 features, so you need a browser that supports those for the best experience. Any modern browser other than Internet Explorer should work. I have tested with Firefox and Chromium.Using the web interface it is even possible to access you central heating system remotely over the internet. If you go that route there are obviously some security considerations to think about.
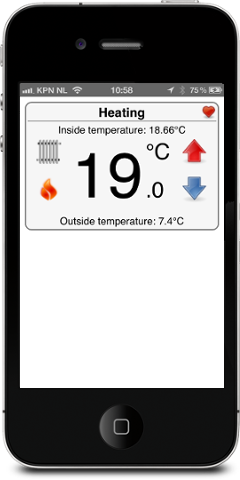
Heating control with an iPhone
The web server has a page specifically designed for use with an Apple iPhone. Using the browser on your iPhone (Safari) go to http://otmonhost:8080/iphone.html, where otmonhost is the IP-address or FQDN of the machine running the Opentherm Monitor application, and 8080 is the port configured for the web server. Replace these values with whatever is applicable for your situation.
If you add this page to the Home Screen and start it from there, you won't
get the address bar and status bar so you get a clean page as shown on the
right. To add the page to the Home Screen, tap the share button
 and choose "Add to Home
Screen".
and choose "Add to Home
Screen".
The Safari web browser supports websockets, which makes it possible to show information updates in real time. The heart symbol in the top righthand side of the screen indicates that the websocket connection is active. Icons on the lefthand side of the screen indicate the flame status, central heating mode, and domestic hot water mode. The arrows on the righthand side allow the user to change the setpoint in steps of 0.5 degrees.